Are you tired of having a dirty driveway? Do you want to take the task of cleaning it yourself but don’t know where to start? Cleaning your driveway can be a daunting task, especially if you’re not sure which products and tools are best for getting the job done. Don’t worry – we’ve got you covered! In this article, we’ll provide some helpful tips on how to clean your driveway without breaking the bank or spending too much time.
From using pressure washers to making DIY cleaners with everyday household items, there is no shortage of ideas when it comes to cleaning driveways. We’ll show you what type of supplies should be used for different types of stains, as well as share some simple techniques that will make quick work out of your next outdoor project.
Finally, we’ll cover some considerations such as safety precautions and environmental impact before giving our top suggestions for keeping your driveway sparkling clean all year round. So let’s get started!
Supplies Needed
Before you start cleaning your driveway, it’s important to make sure you have the right supplies. You’ll need a pressure washer for tough grime and dirt, as well as a sturdy cleaning brush for scrubbing away any stubborn spots. It’s also worthwhile investing in sealant if you want to protect your driveway from future damage. To remove grease or oil stains, you’ll need a degreaser, while a de-icer is essential if you experience icy patches during winter months.
Now that your supplies are all ready, it’s time to get started! If there is large debris on your driveway such as leaves or twigs then these should be cleared away first with a broom. Then rinse the entire surface of the drive using your pressure washer set at low pressure and warm water. This will help loosen up the worst of the dirt so that it can be scrubbed off more easily later. Finally, use a suitable detergent mixed with hot water and begin scrubbing away using circular motions starting from the edges and working towards the center in sections until everything looks clean and shiny again!
Preparation
Before you start cleaning your driveway, it’s important to take the time to properly prepare. This means assessing the layout of your driveway and any areas that need repair work or extra attention before you begin. Inspecting for cracks, chips, potholes, moss growth, and weeds is essential in order to ensure a thorough cleaning. And if debris has been left on the surface then this also needs to be cleared away first with a broom.
When it comes to choosing the right tools for cleaning your drive, there are a few things to consider – including pressure washers and various brushes depending on how tough the dirt is. For tougher stains like grease or oil, you’ll need an effective degreaser. It’s crucial that these products are used safely so always make sure you wear protective gloves and eye protection when handling them.
Finally, don’t forget about sealant which can help protect your driveway from future damage as well as make it look brand new again! Adequately preparing for this task will result in more efficient results and safer use of materials – not to mention fewer headaches during the project itself!
Pressure Washing
Now that you’ve adequately prepared for the job, it’s time to get started on pressure washing your driveway. Pressure washing is one of the most effective ways to clean driveways and can make a huge difference in terms of removing built-up dirt or grime. Here are some top tips when it comes to power washing your driveway:
1. Use an appropriate nozzle – using too powerful a nozzle will damage the surface so always check the manufacturer’s instructions before starting.
2. Start from the bottom up – this prevents water from running down the surface which could lead to streaks being left behind after cleaning.
3. Don’t hold the pressure washer too close to the surface – keeping a distance between 2-4 feet away ensures optimal results without causing any damage.
When it comes to driveway care, pressure washing should be done every year or two depending on how much wear and tear has been caused by vehicles and weather conditions over time. Remember to use adequate safety precautions throughout including wearing protective clothing such as goggles and gloves! And with these helpful tips, you’ll have a freshly cleaned driveway in no time – ready for another few years of curb appeal!
## Cleaning Solutions
Having the right cleaning solutions for your driveway is just as important as pressure washing. After all, it’s the cleaners that will actually get down into the dirt and grime to lift them from the surface. While there are many commercially available cleaner options on the market, you can also make your own DIY cleaning solutions using everyday household items. Here’s what you need to know when it comes to selecting a cleaner product or making one yourself:
1. Choose an appropriate cleaner – look for products specifically designed for driveways or use a mild detergent mixed with warm water. Avoid using acidic substances such as vinegar which could damage some surfaces over time.
2. Pre-treat any stubborn stains before power washing – if needed, apply a pre-treatment solution of baking soda or ammonia to tougher spots like oil spills or tire marks before beginning your power wash job.
3. Make sure you rinse off any leftovers after cleaning – leaving behind excess soap residue can lead to permanent staining so always be sure to give everything a good hosing down afterward!
These simple tips should help ensure that you have the best results when it comes to keeping your driveway clean and looking its best throughout the year – no matter whether you choose store-bought cleaners or opt for homemade solutions.
## Scrubbing
Once you have chosen a cleaning solution, it’s time to get scrubbing! Scrubbing is an essential part of the driveway cleaning process and can make all the difference in how clean your driveways look. Here are some tips for getting started:
1. Choose the right tools – use a stiff-bristled brush or scrubbing pad depending on what kind of surface you’re dealing with (concrete or asphalt). For tougher stains, try using a dedicated concrete or driveway scrubbing brush.
2. Apply your cleaner to the affected area – if needed, pre-treat any stubborn spots before applying your cleaning solution over the entire surface. If making your own DIY cleaner, mix equal parts warm water and detergent and apply them generously with a garden sprayer or bucket.
3. Use elbow grease to work up the lather – let the soap sit on the surface for 5 minutes before using circular motions with your brush or pad to really lift dirt from the nooks and crannies of your driveway. Rinse off excess soapy residue after completing this step.
Scrubbing may be tedious but following these simple steps will ensure that no spot gets left untouched when tackling those tough grimy patches on your driveway. With just a bit of effort, you’ll soon see results that will leave you feeling proud of a job well done!
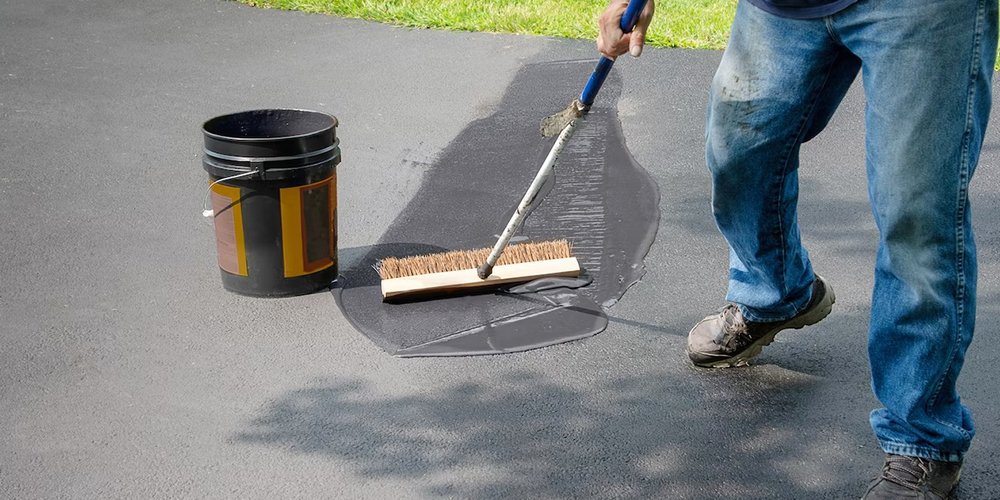
Sealing And Protecting
Once you have scrubbed and cleaned your driveway, the next step is to protect it from further damage. Applying a sealant can help protect your driveways from dirt, oil spills, and other contaminants that can cause staining or discoloration over time. When choosing a sealant type for your driveway, make sure to pick one designed specifically for concrete or asphalt surfaces depending on which material your driveways are made of.
The sealing technique also plays an important role in ensuring proper protection for your driveways. Once you’ve chosen a suitable sealer, be sure to follow instructions carefully when applying—this includes preparing the surface with a broom before spraying the sealer evenly across the entire area. Allow enough drying time between coats so that each layer has sufficient time to settle into place properly.
Aside from sealing itself, maintenance is key in order to keep your driveways looking their best! Regularly sweep away debris and check for any wear-and-tear spots; if needed, apply additional coats of sealer as preventive measures against further deterioration. With some proactive effort and care, you’ll surely enjoy clean and protected driveways year-round!
Removing Oil And Grease Stains
Once you’ve sealed and protected your driveway, it’s important to keep an eye out for any potential oil or grease stains. These types of spots can not only ruin the aesthetic of your driveways but also be difficult to remove if left unattended for too long. Fortunately, there are several effective methods to help with cleaning up these stubborn marks from your surfaces. Here’s a quick guide on how to tackle oil and grease stains:
• Remove Oil Stains: Start by applying an absorbent material such as sawdust or cornstarch onto the affected area—this will absorb most of the existing liquid oils before they have time to settle in deeper. Once this is done, apply some dish-washing detergent directly over the stain and scrub vigorously using a brush; rinse off with water afterward.
• Remove Grease Stains: Asphalt cleaners are great at removing tough grease residues without damaging concrete surfaces. Simply spray some cleaner over the affected spot, let sit for 10 minutes, then use a stiff broom or brush to work away all residue before rinsing off with water. For extra protection against further discoloration, consider applying a sealant after cleaning.
In addition, here are five tips that may prove useful when attempting to clean up oil and grease stains from driveways:
1) Avoid high-pressure washers as this could cause damage; 2) Use hot soapy water instead of solvents when possible; 3) Make sure to scrape excess debris first before treating stained areas; 4) Always test products on small hidden sections first before committing large scale applications; 5) Be patient—it may take multiple attempts depending on the severity of staining! With proper care and maintenance habits like these, you should find yourself easily able to keep your driveways looking pristine year-round!
Removing Moss, Mold, And Algae
Beyond oil and grease stains, moss, mold, and algae are all common dirt accumulators that can also give driveways an unsightly appearance. Fortunately, with the right techniques and materials, these too can be easily removed. Let’s take a look at some of the best methods for ridding your surfaces of these pesky organisms:
Moss Removal: For this one, you’ll want to opt for either a pressure washing or chemical application depending on the level of existing growth. Pressure washing is often the most effective way to get rid of stubborn moss; however, make sure not to use too much force as this could damage underlying concrete surfaces. Alternatively, using a specially formulated moss removal product should do the trick as well! Apply directly over affected areas then rinse off thoroughly afterward.
Mold & Algae Removal: Here it’s important to understand that both mold and algae can spread quickly—so don’t let them sit for too long before treating! In order to effectively remove them from pavements or stone slabs without causing any harm, try combining equal parts bleach and water in a spray bottle (it helps if you pre-wet the surface first). Next just apply the mixture onto the stained area then allow at least 15 minutes before scrubbing away with a brush. Be sure to rinse it off with plenty of clean water afterward!
To sum up, getting rid of those unsightly marks from your driveway doesn’t have to be difficult! All it takes is knowing what type of stain you’re dealing with along with which method works best for each individual situation. With proper cleaning habits like these in place, keeping your driveways looking fresh will never be an issue again!
De-Icing Agents
When it comes to winter weather, driveways can quickly become icy and hazardous. To combat this slippery situation, de-icing agents is an absolute must! These products work by introducing either anti-icing chemicals or ice-melting compounds into the surface of your driveway in order to reduce friction and provide extra traction. Here’s a look at some popular options:
De-Icing Agents: When temperatures drop below freezing, these powerful solutions will effectively melt away any existing snow or ice on contact. The most commonly used type is rock salt which is both cheap and easy to apply—just sprinkle generously over affected areas then let nature do the rest. However, for more extreme conditions, specialized de-icers containing calcium chloride might be necessary instead.
Anti-Icing Chemicals: This unique solution works slightly differently compared to its counterpart as it prevents ice from forming altogether! By creating a protective layer between the ground and falling precipitation, anti-icing chemicals stop further accumulation before it even starts. Popular choices include magnesium chloride and potassium acetate; however they tend to be pricier so only used when needed.
Traction Grit: Last but not least, adding gravel or sand (a process known as ‘grit spreading’) can also help improve traction on sloping surfaces like driveways during winter months. While not technically a chemical product, grit has been proven effective time after time due to its rough texture which increases grip and stability while simultaneously preventing skidding accidents. Just make sure you spread enough evenly across the entire area for optimal results!
It’s important to remember that regular maintenance is key when dealing with cold weather conditions such as these—so don’t forget about taking proactive measures like prepping your driveway beforehand! With proper preparation along with the right de-icing agent choice for each individual scenario, keeping smooth sailing through those frosty months should be no problem whatsoever!
Finishing Touches
Once the de-icing agents have done their job and melted away any existing snow or ice, it’s time to put those finishing touches on your driveway. Whether you’re looking for a subtle update or an all-out makeover, there are plenty of ways to spruce up this area without breaking the bank.
Driveway edging is one great option that can really transform a yard in no time at all. Not only does it add visual appeal, but also serves as a practical solution by preventing grass from encroaching on asphalt surfaces. Plus with so many materials available—from bricks and stones to concrete curbs—you’ll be sure to find something perfectly suited to your budget and style!
Outdoor lighting is another great way to create ambiance while simultaneously providing additional safety benefits. From solar-powered lamps along pathways to uplighting around trees and shrubs, these simple upgrades will not only brighten up your property each night but also make it easier (and more enjoyable!) when coming home after dark.
Finally, don’t forget about landscaping ideas like planting colorful flowers around walkways or adding decorative pavers near entrances. This kind of effort can go a long way when completing outdoor projects such as these; plus who wouldn’t want a pretty flower garden greeting them every day? Last but not least, sealing pavement with specialized sealers provides extra protection against harsh weather conditions like freezing temperatures and constant sun exposure. With just a few finishing touches here and there, cleaning your driveway yourself won’t feel quite so daunting anymore!
Frequently Asked Questions
How Often Should I Clean My Driveway?
When it comes to driveway maintenance, one of the most commonly asked questions is: how often should I clean my driveway? The answer depends on your climate and usage habits. It’s important to establish a consistent cleaning schedule for your driveway so that you can keep it looking great all year round.
To ensure regular driveway cleaning, consider these factors when crafting your own maintenance plan:
1. Climate – Cleaning more often may be necessary in climates with frequent rain or snowfall.
2. Usage – If you have lots of vehicles driving over the same spot every day, you’ll need to increase your frequency of cleaning.
3. Wear & Tear – Cracks, chips, oil stains, etc., will require extra attention if they are not taken care of quickly and regularly.
It’s recommended that homeowners create their own unique driveway maintenance schedule based on their specific needs and conditions. For example, those living in an area with heavy rainfall might want to invest in professional-grade sealant treatments as part of their regular cleaning routine while others who don’t experience much precipitation could get away with an occasional pressure wash once or twice a year. Ultimately, it’s up to each individual homeowner to determine what works best for them when it comes to maintaining a neat and tidy driveway.
No matter where you live or how frequently you use your driveway, there are many simple steps you can take like sweeping debris off the surface weekly or mopping up spills right away which will help reduce buildup over time and make sure your drive stays cleaner longer between deep cleansings.
What Safety Precautions Should I Take When Cleaning My Driveway?
Safety precautions are essential when cleaning a driveway. It is important to consider the safety of yourself and others before beginning any sort of driveway cleaning project. Protective gear, such as eye protection, gloves, and closed-toe shoes should be worn at all times while performing this task. Additionally, eco-friendly solutions should be used in order to minimize potential environmental harm while aiding in the process of driveway cleaning.
When considering personal safety during driveway cleaning it’s imperative that you take certain steps to ensure your well-being. Here are four tips for keeping safe while completing this project:
1. Wear protective gear like goggles, gloves, and sturdy shoes;
2. Utilize eco-friendly solutions for optimal results with minimal risk;
3. Take regular breaks if necessary;
4. Make sure there are no bare wires or sharp objects present.
Following these four simple steps will help reduce your risk of injury or damage occurring due to improper technique or negligence whilst working on a driveway clean-up job. Furthermore, utilizing eco-friendly products can create an even safer work environment by reducing potentially hazardous chemicals and fumes that could occur with other more traditional methods of driveway cleaning. Not only does this make the area safer for both workers and bystanders but also creates less waste overall which helps contribute towards a healthier planet.
Overall, taking the proper precautions when undertaking any kind of driveway cleaning project is key to ensuring everyone’s safety during the operation. Properly equipping oneself with appropriate protective clothing and using eco-friendly solutions whenever possible can significantly reduce risks associated with unsafe practices often seen during typical home improvement tasks such as driveway maintenance.
What Type Of Sealant Should I Use?
When it comes to cleaning your driveway, one of the most important steps is applying a sealant. But what type of sealant should you use? It depends on several factors such as the material used in your driveway and how much foot traffic there is.
There are many different types of driveway sealants available; some are designed for specific materials such as concrete or asphalt while others are more general-purpose products. When selecting a sealant, make sure that it’s compatible with your driveway’s existing material. Additionally, consider how much foot traffic there will be on the surface – this will determine which type of sealant would be best suited to protect against wear and tear over time.
Finally, when it comes to application, you’ll need to follow the manufacturer’s instructions carefully in order to get an effective result from your chosen sealant. This includes preparing the surface properly before sealing and ensuring that all areas have been covered evenly during application. With the right knowledge and preparation, you can ensure that the job gets done correctly so that you end up with a long-lasting protective coat for your driveway surfaces.
Are There Any Eco-Friendly Cleaning Solutions Available?
Are there any eco-friendly cleaning solutions available for driveway cleaning? This is an important question to consider when looking for green alternatives. Everyone wants to be as environmentally conscious as possible, so finding natural solutions that are safe and effective is key. Eco-friendly products offer numerous benefits such as reduced water pollution and fewer health concerns from chemicals.
Fortunately, many companies have developed eco-friendly products specifically designed for driveway cleaning. These alternatives often use plant or mineral-based ingredients which are biodegradable, non-toxic, and contain no hazardous compounds. Additionally, these natural cleaners can help improve the longevity of your driveway by preventing mold growth and reducing wear caused by harsh chemical cleaners.
When selecting an eco-friendly product, it’s important to read labels carefully in order to make sure you’re getting a quality solution. Look for products with certifications such as Green Seal or EPA Safer Choice which indicate they meet certain environmental standards. It’s also wise to research reviews online before making a purchase in order to ensure the best results and value for your money.
By taking the time to find an appropriate eco-friendly cleaner, you can rest assured knowing that your driveways will remain clean while being kinder to the environment at the same time!
What Is The Best Way To Remove Tough Stains From My Driveway?
Removing tough stains from your driveway can be a daunting task, especially if you don’t have the right materials and know-how. Fortunately, there are several options available to help you achieve stain removal quickly and effectively. From eco-friendly solutions to chemical solutions, here’s what you need to know about removing tough stains from your driveway:
• Use a pressure washer – Pressure washing is one of the most popular methods for cleaning driveways because it’s effective at getting rid of dirt and grime build up as well as tough stains.
• Apply cleaner with scrubbing brush – If the stain has set in for some time, then using an appropriate cleaner combined with a scrubbing brush may be necessary to remove it. Be sure to check that the cleaner won’t damage the surface of your driveway before applying it.
• Invest in sealants – Sealing your driveway regularly will help protect it from future staining and make stain removal much easier. Choose an eco-friendly sealant if possible for added protection against environmental hazards.
When searching for a solution to remove tough stains from your driveway, consider whether or not any of these methods would work best for you based on the type of stain and how much time and effort you want to put into removing it. Keep in mind that different surfaces require different levels of care when removing stubborn stains so always read product labels carefully before use. Furthermore, investing in sealants can go a long way towards preventing further staining by providing extra protection against harsh elements like rain or snow which can lead to permanent discoloration over time. With these tips in mind, achieving spotless results should be easy!
Conclusion
Cleaning your driveway is an important part of home maintenance, and it’s easy to do yourself. Follow the tips in this article for a clean, attractive-looking driveway that will last for years. Start by determining how often you need to clean your driveway and take safety precautions before beginning any work. You may want to consider using a sealant or eco-friendly cleaning solution when needed. Finally, use the best methods to remove tough stains from your driveway so it looks as good as new.
I’m confident that if you follow these steps, you’ll have a beautiful driveway with minimal effort. It can be daunting at first, but with practice comes success! Plus, taking care of your own property not only saves money but also gives you a great sense of satisfaction knowing that you did it all on your own. So don’t hesitate to start tackling those driveways today!
Good luck and happy cleaning!